Follow my blog with Bloglovin
Showing posts with label diy. Show all posts

Sunday, 4 January 2015

DIY 2015 Memory Jar

Hey,
So after my little holiday off blogging over the Christmas break, I am finally excited to get into it again. I’ve had a good start to 2015, and I hope you have to, and that you haven’t broken all your new year’s resolutions quite yet! Today I wanted to do a DIY which I have actually made an annual tradition for myself. Today I am going to make a memory jar. I know this idea isn’t 100% original, as it is all over Pinterest, but every year I make a new memory/achievement jar and thought I’d show you!

A memory, or achievements, jar is a very simple but cute idea. Throughout the year you note down little things you’ve down, exciting days or things you’ve accomplished. Write down your comment and fold/ screw up the paper. Over the year, you let the note fill the jar- and no peaking is allowed. On the last day of the year, empty the jar into a bowl and pick out the notes at random. I did this for 2014 and it was so lovely to open the notes at the end of the year. You get to remember days you may have forgotten or little achievements that seem insignificant by December, and this is a really enjoyable thing to do.


To make the jar, you can use whatever you have. Here I will show you two possible options, and my jar from last year. You can make it simple or overcomplicate it; it can be made to whatever your tastes are.


Jar 1.                     The Words Jar

All you need for this jar is:
·         A clean empty jar
·         Pens- I used sharpies and I found darker colours are always better

1.       Make sure your jar is clean and is a blank canvas to work on. Just take off the label and wash up the jar.
2.       Take the pen, or pens, of your choice and begin to write different words all over your jar. Vary the words in shapes and sizes, and you could also change the colours. I wrote words like memory, happiness, friends, joy and achievements. You could also draw patterns if you wanted.
3.       I also wrote a big 2015 on the jar, but you could make a label to put on the front.
4.       I left the jar there but you could also add ribbons etc.


Jar 2.                     The Shabby Chic Jar

All you need for this jar is:
·         A clean empty jar
·         Scrapbook papers/ patterned card
·         Paper
·         Printed label (optional)
·         Ribbon/ twine/ lace
·         Glue/ tape 

1.       Make sure your jar is clean and is a blank canvas to work on. Just take off the label and wash up the jar.
2.       Choose any patterned card/ scrapbook paper and cute a strip that will fit around your jar. This card can have any thickness, but it must fit around the jar.
3.       Stick the ends of the card together, using either tape or glue.  
4.       Next I chose some lace, which is actually stick on lace, to go around the jar.
5.       Fourthly, I decided I wanted a printed label. All I did was write ‘memories 2015’ in a powerpoint -but any software would basically work, chose a font I liked and print it off. Then I stuck this onto a rectangle of card and stuck that onto the scrapbook paper.
6.       To finish off my jar, I took some twine (which I got at the local Homebase) and doubled it up. Then I made a bow around the lip of the jar to complete it.

My 2014 jar was similar to the shabby chic jar DIY accept I used black card, red ribbon, wrote my own label, used clear stars and a wooden frame (which is normally used for scrapbooking).


So that is all of the jars. I hope you liked this DIY and will give it ago because I would love to see your jars to (feel free to leave links down below). I have also made a board on my pinterest of some other memory jars for inspiration for you, so go have a look here. I hope the beginning of your year was good and that you all have a brilliant day,


Social networking-

Tuesday, 23 December 2014

Stained Glass Window Star Biscuits | Blogmas Day 23


Hey,
So today’s post is going to be a recipe that lets you make these tasty festive stained glass window star biscuits. The biscuits are so cute to make and would be perfect for a gift or just a winter treat. I also love how they look festive but are an alternative to the usual traditional recipes.
One this I would say is that they are definitely a required taste and are not like a usual biscuit or cake because the sweet center adds a fruity sugary flavour. 

To make these biscuits, you will need:
·         90g of butter softened
·         100g Unrefined golden caster sugar but I ran out so used a mixture of granulated and caster sugar
·         1Egg (free range)
·         1tspVanilla extract
·         200gPlain white flour
·         ½tspBaking powder
·         ½tspSalt
·         Boiled sweets
·         75g White Chocolate


1.       Mix together the flour, salt and baking powder in a small bowl. Set this aside.
2.       In another larger bowl, cream the butter and the sugar together.
3.       Add the egg and vanilla extract to the creamed butter and sugar.
4.       Now mix in the dry ingreiants, from small bowl, into the larger bowl mixture. Slowly add until a dough is made.
5.       Wrap the dough in cling film and chill in the fridge for one hour.


6.       After one hour, heat the oven to 170.C and flour the surfaces. I found that I had to pat quite a lot more of plain flour so that the dough was dry enough to roll.
7.       Now chose how you will make the biscuit shape. I used cutters I already had, but you could always print off some images of the internet.


8.       I rolled out the dough into the thickness I wanted and then I cut out the shapes I needed. Then I used a smaller cutter to create the star shape inside them. Then I repeated until all of the dough was used. This made about 20-30 biscuits.
9.       Place the biscuits onto a buttered piece of baking paper, on a baking tray. It is important that you butter the paper so the sweets don’t stick when they melt.
10.   Bake in the oven for 8-12 minutes until the sweets have melted.
11.   Let the biscuits cool and then put them in an air tight tin/ box. I used an old celebrations box.
12.   Now you must make the icing decoration. I used melted white chocolate but you could always use plain icing.


13.   To melt the white chocolate, chop it up into small pieces.
14.   Then I boil the kettle, and put a small amount into a saucepan. This method of melting chocolate is called a bain-marie.
15.   Put the small pieces of chocolate into a bowl that will balance on top of the saucepan but the water does not touch the bottom of the bowl. Then stir the melting chocolate with a wooden spoon.
16.   When all the chocolate has melted, I take it and put it into a piping bag. If you do not have a piping bag then you could try using a knife or a homemade piping bag- there are lots of tutorials for this on youtube.
17.   Now is the part for getting creative. Take your piping bag of chocolate and creat whatever shapes you want.
18.   Place to chill in the fridge so the chocolate can set. This will take only 10 minutes.


Done! These adorable biscuits are perfect for making with the family or just as a gift. If you make them let me know down below, I hope you all have a super Christmas-y Christmas Eve Eve, have a great day, 

Social networking-

Wednesday, 3 December 2014

DIY Frosted Tealights | Blogmas Day 3


Hey,
So I am very excited about today’s Blogmas post because I am doing a festive DIY. The idea of this DIY isn’t originally mine as I took inspiration from many similar ideas on Pinterest. Pinterest is a GREAT website for DIYs, and if you fancy making something this season, be sure to check it out.
The DIY I am making today is frosted tealights, which is basically tea light holders decorated with white glimmer (that’s looks so much like snow/frost). The DIY is SO simple and cheap to make, as well as the fact that it uses recycled jars.

If you’re a reader of my blog, you may remember that I did a tealight DIY earlier this year, in February, using old tins and I know this is similar but I could not resist showing you what I made! I hope you enjoy!


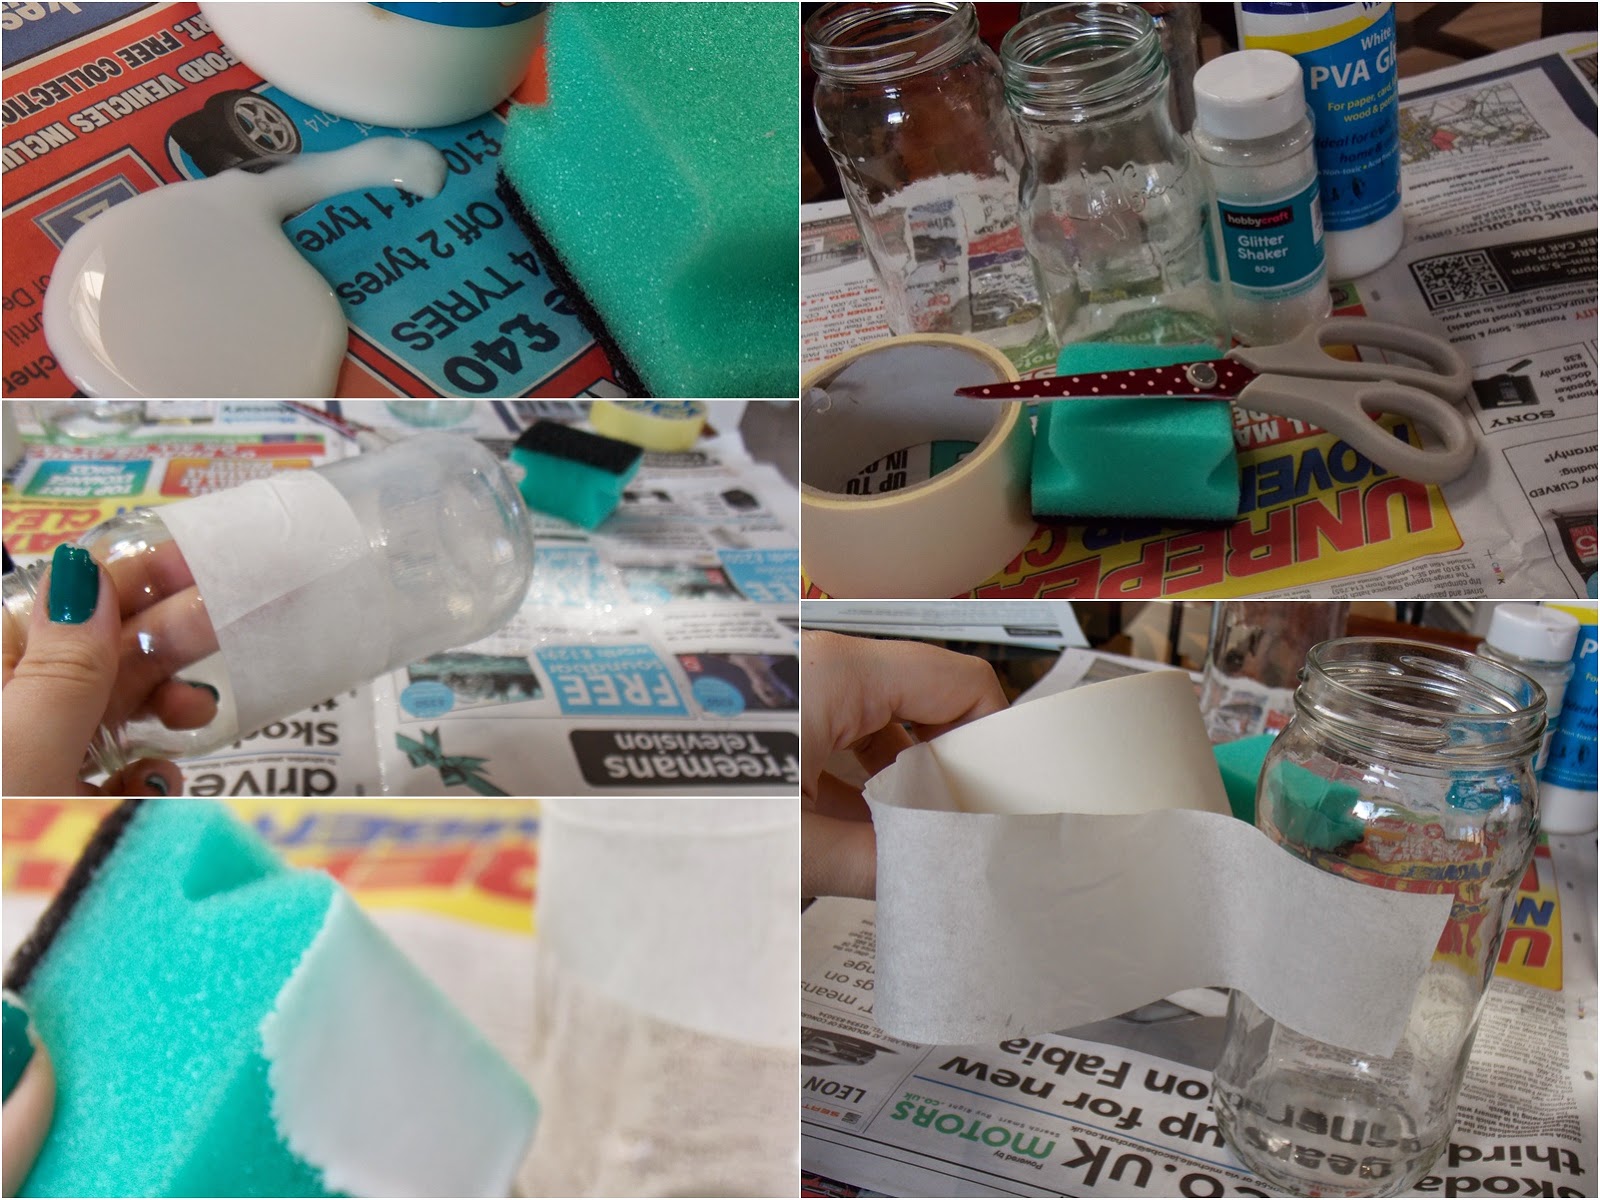
This DIY takes about 2 hours on average, taking in mind that the PVA glue needs to set.

What you will need:
·         Old/used jars which have been cleaned out
·         White glitter, or another glitter of your choice
·         PVA glue
·         Masking tape, masking tape works so much better than other tape because it comes off easier  
·         Sponge/ paint brush
·         Spare glass
·         Scissors
·         Newspaper
·         Optional- decorative bits, for example ribbons


1.       Make sure your jar is clean and does not have the label/ any label glue attatched. You can use any shape/ size jar depending on what you have spare. Some ideas are old glasses, sauce jars, jam jars and Nutella jars.

2.       Choose your first jar, take the masking tape and choose how high up you want the glitter to come to. Then carefully wrap the tap around, trying the get the line as level as possible as this will give you the best result. If your jar is smaller at the top and some cuts into the masking tape.

3.       Now newspaper your work space.

4.       Next pour out some PVA and dip your sponge into it. Don’t put too much glue on otherwise the glitter may clump.


5.       Pour some glitter into your spare glass, you only need a little amount, and tip it onto a part of the glue. Then try and pour the glitter back into the cup, repeat the process until the glued section is covered in a thin layer of glitter.

6.       Leave the jar aside for at least 45 minutes. This will let the glue dry so that the glitter sets.


7.       When the glitter it set, carefully unpeel the masking tape, revealing a crisp straight line around your jar.

8.       Now you can add any decoration if you want to. I love how the jars look with and without decoration, but adding to the does make them look more professional and personalised. You can add whatever you want, for example, stickers, Christmas decoration, ribbons or bows. I made one using a holly card-making decoration and a red ribbon.


9.       Add a tealight and light on a festive night to see the frosted look! I used a variety of unscented and scented tealights for mine, I would definitely recommend getting some scented ones from ikea, these vanilla ones are really strong for the price I paid.

And that’s all. I love this because it is so easy and everyone can do it. I think the tealights are great for Christmas because they look so wintery! I think they are a great gift idea and would be perfect for a friend/ family member, as well as a neighbour/ teacher.  You can change the DIY to suit you and play around with the design to make it unique. Some extra ideas could be to change the colour of the glitter, make snowflakes and stars spaces in between the glitter and change decorations.


I hope you enjoyed seeing this festive DIY post, I would love to see any of your creations- especially if you have a go at this one, so leave your links down below. If you want to know more about me, I would love it if you could ask me some festive questions on my Q&A page. I hope you all have a wonderful day,

Social networking-

Friday, 22 August 2014

DIY: Notebook | Back to School 2014


Hey everyone,
So today is my first post in my ‘back to school 2014’ series. I know I’m doing a lot of series posts at the moment, however as #summerstyle is coming to the end, it’s easier to plan blog posts like this. So I hate to say this, but this beautiful summer holiday is going to come to an end- no matter how much I try to put it off in my mind. So I’ve decided that the only way I can make the idea of going back to school a little less painful is that I can be school-ready, which means I have all the necessary school supplies! There will only be a few posts, but I hope this may help/inspire a few of you.
Today’s post is a DIY. When I have tests in school, I am often lazy and put off revising, especially in my science subjects. One of my school goals for this year is to improve my effort and grades in science, and I want me revision to be less forced! I decided I wanted a separate revision book for physics, chemistry and biology. I looked in the shops, but notebooks are either too expensive or too nice for school work. So I decided I’d DIY some notebooks, and I thought I’d make a post so that you can too!

Time for DIY: 30 mins


What you’ll need:
·         A notebook, I used A4. You could use a notebook you already have if you want, it will not matter by the time you’ve finished!
·         Scrapbook paper. I used a pad of different papers, but you could use coloured card, wrapping paper, images of the internet, magazines etc. Be imaginative!
·         Scissors
·         Glue
·         Pencil
·         Two alternative coloured pieces of paper or card
·         (Optional) A computer with a lot of fonts


Step 1-
Take your notebook and remove any stickers on the front. Then take your scrapbook paper and select a piece of pattern that suits the colour of the notebook (because a few cms on the front will show). Make sure that the piece is large enough to cover the page. Then draw around it using your pencil.

Step 2-
Cut around the paper, using the lines you’ve drawn. Make sure that you fit the paper as well as you can, the more precise you are, the better it will look. Then stick it on using a Pritt stick (glue)- you may need quite a bit. Also make sure that you glue right up until the corners so that the paper doesn’t un-stick!


Step 3-
Now you are ready to create the label on the front. So you will need two pieces of card/ paper to layer on the front. Cut one smaller than the other. I chose a piece of brown scrapbook paper and then also a piece of lined paper (from a notebook). Glue on the larger piece of card, I chose to place mine in the centre but you could put it anywhere, see what you prefer.

Step 4-
For the top label, I chose to write my subject name. You could alternatively write your name, class, teacher etc. Now this is an optional step, but I loved how it looked on the book. So you can either write like you would normally, although I would recommend a few practises, or use this simple tip. If you go onto your computer and load a program on which you can write on, write out your subject and select your favourite font. I chose a handwritten one. Then either print it onto the paper or trace it onto your paper.

Step 5-
To finish off your notebook, all you need to do is stick down your smaller label. Then the notebook is ready to be used.

I think this DIY is so cute and effective. The boring plain notebooks I bought from Tesco were only £2.00, and I already had the scrapbook papers, so this was a cheaper alternative to pricy £5.00 notebooks, and it’s personalised for you. I’d love to see your DIYs, please send them to me and comment down below what you thought.
For surviving back to school,


Wednesday, 30 July 2014

DIY: Easy Summer Drink | #summerstyle


Hey,
So today is a DIY for a quick summer drink. In summer time, summer drinks are great to have- why not try something sweet, something sour or something fruity? We all love a starbucks or costa beverage but I’m not too sure those drinks are good for our tummys or our purses. This DIY is literally so easy but a great way to spice up a basic drink.
This is how you make a aquatic iced orange, which, in other words, is water with orange.


1.The night before, take a fruit of your choice, in this recipe we use orange, and cut it up into slices. Put these slices into a freezable zip-lock bag and put it into your freezer. This takes up very little room and time.
Also, using an ice cube tray, which are available in a range of shapes, sizes and prices. Fill it with water and leave over night to freeze.
2.       Keep water in the fridge. If you keep a bottle, it means you can have cold water at any point- much cooler than from the tap. So grab a glass and fill it with cold water.
3.       Go to your freezer and put in 3-4 ice cubes, this keeps the drink cold for a long time. I had heart shapes ice cubes, the tray was from Ikea.
4.       Also get your zip lock bag and open it up. The fruit may be stuck together- this doesn’t matter. Try to separate the pieces of fruit or snap them apart, and put them in to the iced water.
5.       Add a straw and go!

  1. That’s it! So simple but delicious. I find this drink is great because it tastes fresh, and is similar to squash without the extra sugar and preservatives. Orange has been my favourite so far but why not try lemon, berries, watermelon or grapes! It’s wonderful to experiment with and fab for all ages.


So what do you think? Have you tried this basic recipe before? Let me know in the comments below. Sorry this is just a quick one,

Sunday, 15 June 2014

DIY: Floral Crown | #summerstyle

Hey everyone,

So this I have decided that as my first summer blog post, this post will be the beginning of a series called ‘#summerstyle’. In the next few weeks/ months, I will be including some summery themed beauty/ fashion/ random posts. I hope you will all enjoy this series, feel free to leave ideas, requests, comments and any of your summer posts.


This post is a DIY for you all; I hope you enjoy it as I put a lot of effort into making it. I wanted to make a DIY project that would be quick, cheap and yet a currently trending fashion item, so I chose to create my own floral crown.
Floral crowns have become especially popular in the last year, and now that festive session has begun- they are everywhere. I personally love any type of floral accessories, but the floral crown/ headband is one of my favourites. I think they are great as they can complete an outfit, create a unique hair style and add a pop of girly colour into an everyday look. The best thing about them are that they are fab for summer, both at home or on holiday, because they’re so easy to wear and so bright and fun.


So lets start, yeah?

Equipment for this DIY:
  • 99p/ £1 shop fake flowers
  • Cheap basic hair band elastic, you can either buy a plain one or you can buy one with a flower/bow attachment and take it off. Check your hair accessories as I already owned one, so I’d advice checking.
  • Needle and thread
  • Pins (optional)

As you can see, there aren’t many expensive parts to the equipment list, as I wanted to keep this DIY as cheap as possible.

Instructions:


  1. Prepare you flowers. I had to take mine off of a stem, but I could just pull them off. You may also need to trim the bottom of the flower, as the stems can make it hard to sew.
  2. Take the hair band and stitch on the first flower, you can position this anyway you like- I chose to alternate between the flowers facing out or up. Changing this will create the desired effect you may want. Start in the middle of the band and work out.
  3. Continue stitching flowers on, remembering to put them close together so that no gaps are left. Feel free to overlap and know that you must add many stitches to the flower- until it is well fixed.
  4. When the flowers are stitched on and you have an even amount of flowers on both sides, you can decide if you are done.

Styling:

There are so many ways to style floral crowns, you can fin these looks from celebrities, beauty/ fashion bloggers and in the everyday person. Below are some examples of possible looks I tried. I pinned my fringe back and left my hair down, curly. I wore my hair in a scruffy loose pony tail, and add the floral band to make the look more interesting. And I also wore my hair is a curly up-do bun, this look is a little more suited to a night out or a less casual look- but the floral crown keeps it fun.


So that’s it, see how simple but effective this DIY is! If you are going to make one, leave a comment down below,
Have a lovely summery day,


Sunday, 27 April 2014

DIY: make up storage

Hey,


So today’s post is a DIY on how to make your own make up storage to fit in your drawer. I looked and looked for cheap and simple make up storage but I didn't find anything to my taste, so I decided to make my own! My DIY is so simple and basically separates your drawer to organise your makeup in a way that will be unique to your make up collection.

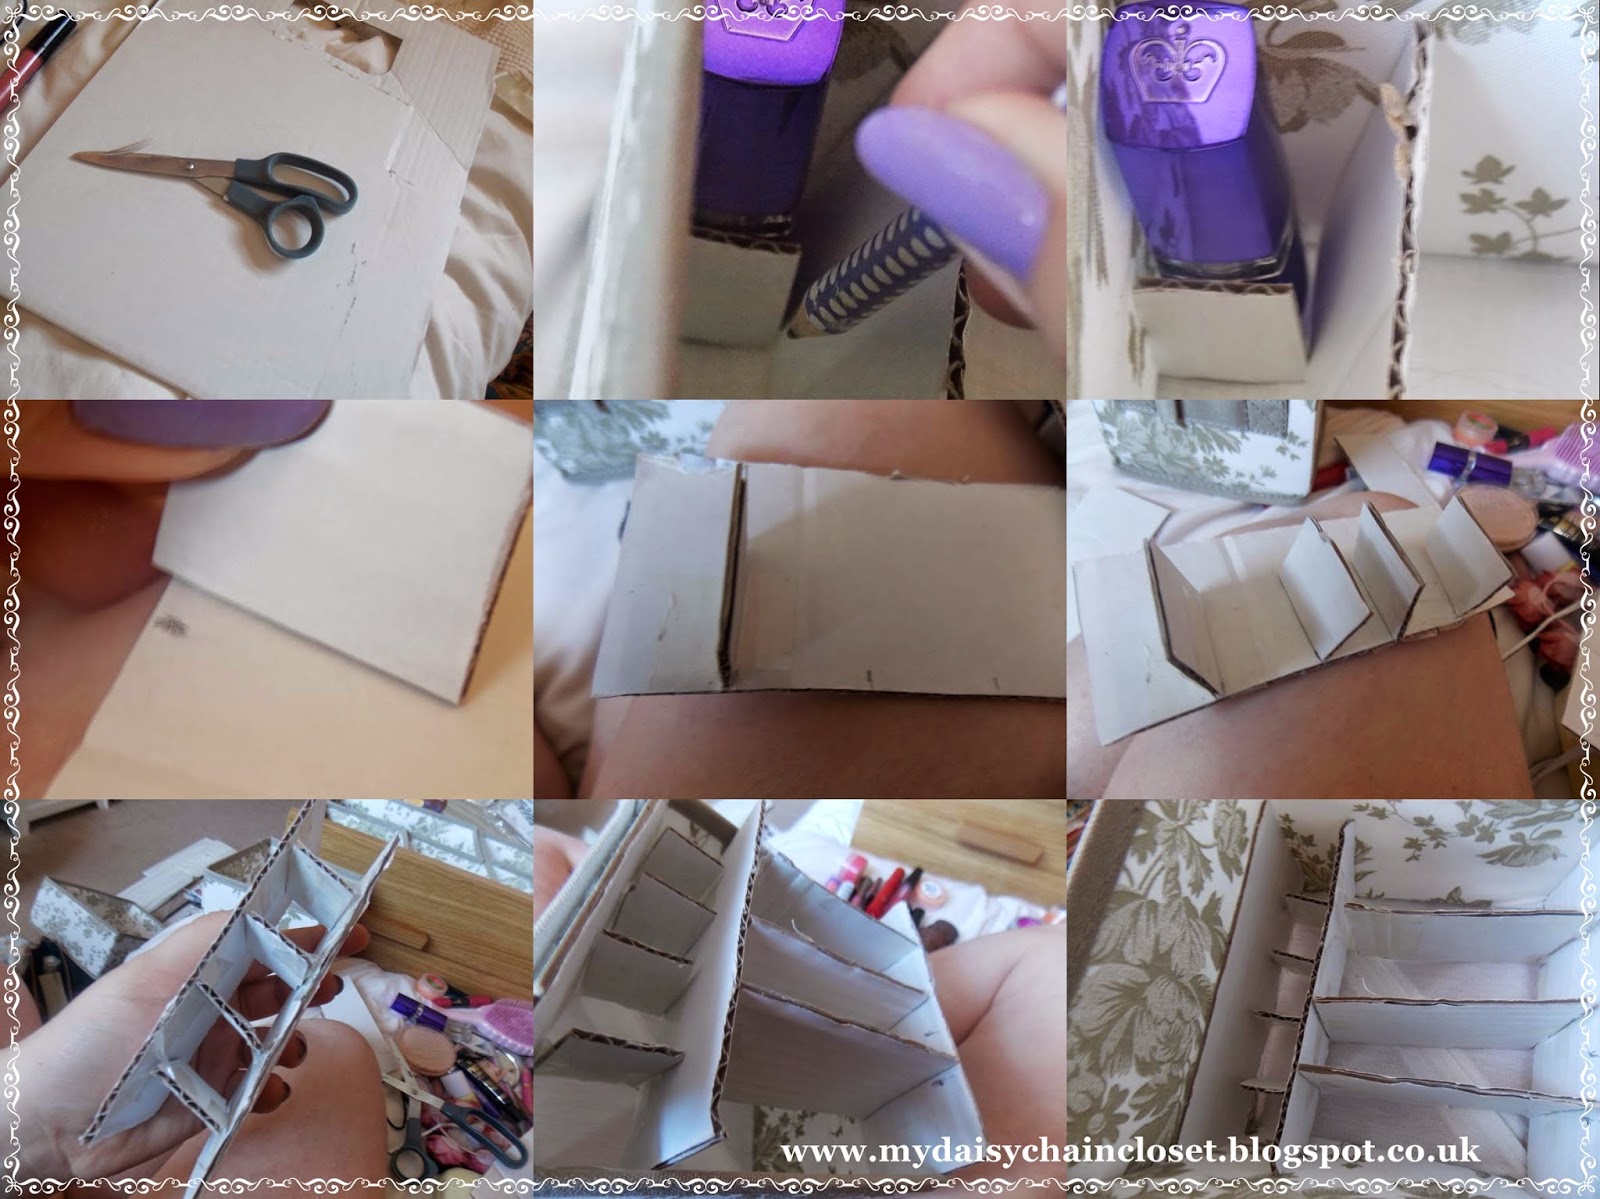
All you will need is:


1.      First put in your drawer inserts to how you would like them.
2.      Take one compartment, to start with. Measure the width and length of the box and cut lengths of card- these will become very handy! These can be any height that you want them to be.

3.      With one of your lengths/ widths, take the first product you want to store. In the image, I choose a lipstick to begin with. I marked onto the card where I needed the other piece to be. Then I cut a piece of card that is the width of the lipstick.

4.      To stick these pieces together, I put L shape of sellotape on either side of the card.  Then I repeat the process of adding pieces of card that are the widths of the products. In my example, I had a line of lipsticks, so the widths were the same.
5.      Now you have to keep adding pieces of card, and fixing them with the sellotape, until you have filled the space that is equivalent of the width/ length of the drawer insert.
6.      Carefully push in the card layout into the drawer insert, and then fill it with the perfectly fitting make up.


I’m sorry because I seem to have made a really easy DIY seem really complicated, but this is where I was inspired, a video on LaurDIYs channel- https://www.youtube.com/watch?v=VeXYsZDZwBY .
I hope you like my idea, please let me know if you want to try this DIY or if you have any other ideas,

Thank you, 

Sunday, 16 March 2014

Homemade- DIY lanterns

Hey,


Today’s blog post is one that I’ve been really excited about. I have been doing a lot of crafty and arty activities, and I have always loved DIYs, so this is going to be a home décor DIY.
This is a step by step to make a homemade tea-light lantern. These are so cute as a gift or as room décor, and are brilliant to accessories your room with. Also, this is based on recycling a product, which makes this such an amazing eco-friendly task.


I came up with this idea when I saw something similar in a shop. I google it and found inspiration for my final design via Pintrest and http://growcreative.blogspot.co.uk/2012/07/tin-can-lanterns-tutorial.html .

You will need:
  • A food tin, I used Heinz beans
  • Wire
  • Paint of any colour, acrylic is better
  • Paintbrush
  • A nail
  • A hammer/ a pebble
  • Paper and a pencil
  • A tealight

  1. The first step is to use whatever is on the inside of the tin. After this, just wash the tin and dry it. Make sure you remove the label. Once the product is drained you are ready to start. You will need to measure round the tin and then produce a slip of paper which fits around the tin. You will need this for the pattern.
  2. Now fill the tin with water and put it into your freezer. Now leave it overnight, or as long as it needs to freeze.
  3. Whilst you are waiting, take the paper and draw out a pattern. Putting dots on the places where you want holes. This can be any sort of design, like swirls, hearts, zigzags or flowers. Feel as free as you like, but remember that the ends of the paper will match up. Also remember to draw bigger dots for where you want the handle to be.
  4. Take your tin out of the freezer. You will need to be prepared for the next steps as you can needs to stay frozen.
  5. Now, using a towel if you want (so the table does not get wet). Take your paper and sellotape it around the tin. Now take the nail and place it over the dots on your design. Hammer the nail with your hammer/ nail, until it breaks through the top layer of the tin.
  6. When you have completed all the dots, and your frozen water will probably not very cold. Put the tin into a sink of hot water. This will melt the ice quicker.
  7. When the tin is ready, and has no ice inside, you can continue. Take the tin and begin to paint it. You can you any paint, spray is probably preferable though, and paint the tin. It will take a lot of layers to build up colour.
  8. Now measure out how much wire you want, for the handle, depending on what type of lantern you desire. Now paint this, also with many coats.
  9. When you have done these steps, and the paint is dry, you can put it together. The handle is simply threaded through the larger holes and twisted.
  10. To finish, you can add ribbon around the bottom. Now your lantern is complete. Add a tealight in the bottom.


So I hope you enjoyed this little DIY, it’s my first home decore of my new home-made series. I would love to know what you think and some of your creations. Sorry I missed my post on wednesday. Enjoy, 


Sunday, 16 February 2014

Floral Nail Polish DIY


Hey,
So its half term at last, I know it feels like ages since the Christmas holiday for me, and I hope all of your weeks are as amazing as possible.


At my school, in England, as part of the uniform rules we are not allowed to wear nail polish. I hate this as I love to do and wear nail polish. So in half term one of my first activities is to paint my nails.

Although I love nails and nail polish, which I am quite good at applying on my own nails, I do make mistakes.When I try daring new nail ideas, mistakes do happen. I tried a black and white dot look, with floral on the accent nail, but it failed! So when I’d bought myself a new top coat and gorgeous pink shade, I was brave enough to try again- having inspiration from this image I discovered on Pinterest.co.uk. Follow my Pinterest here http://www.pinterest.com/lydiamoxham7/ , although I barely use it!


Here is a list of all the colour polishes I used, where you can get them and price, if they are not available anymore I will link an alternative.


  • Topcoat/ Basecoat- my favourite has to be ‘All in One’ Nail Paint by BarryM and is available in most if not all make up stores. This product is a basecoat, topcoat and adds shine. It is also a nail hardener and is my top tip for nails polish lasting and looking great. I have tried more expensive ones and a variety of similar clears, but this is my personal best find. Find it here, for just £2.99: http://www.barrym.com/products/nails/care/all-in-one-nail-paint.html
  • ‘Mint Green’ by BarryM is the background on the accent floral nail. It is one of the traditional nail paints, in a beautiful pastel green shade. I got it in  a set a while ago, but it is also available for £2.99 here http://www.barrym.com/products/nails/paint/all-nail-paints.html
  • ‘Shocking pink’ by BarryM. I used this for the original blob on the nail. One of the normal nail paint price of £2.99 here at http://www.barrym.com/products/nails/paint/all-nail-paints.html
  • For the top highlight I used a really old nail polish from a cheap set from an unknown brand. Mine has a slight glitter in it, but for a light pink shade, I think ‘baby pink’ from BarryM would be similar. It is again from their normal nail paint range but is only £1.99! http://www.barrym.com/products/nails/paint/all-nail-paints.html
  • The next is the colour for the other nails and middle pink shade. It is an absolutely gorgeous colour from Kelly Brook nails, found in New Look stores, although I can’t find a link online. I bought this really recently so it should still be available. It cost just £2.99. The label of the bottles just says- ‘KB nail polish- nautilus’.
·        For the leaves of the flowers I used a Rimmel London nail polish, from the lasting finish range. It is a emerald green shade called ‘block your green’. It again is avalible for just £2.99, http://www.superdrug.com/nail-polish/rimmel-lasting-finish-nail-polish-block-your-green-700/invt/453364 at Superdrug.

Just follow the steps on the pinterest image or my photo step by step (although the images are a little blurry) to create this look, it takes practise but I’m proud with my left hand result, even though my right is a complete mess!!!


I hope this inspired you to try these fun floral nails or some colour nail paint inspiration. Please leave a comment below saying what your favourite nail polish idea is. I hope you enjoyed this,