Follow my blog with Bloglovin
Showing posts with label homemade. Show all posts

Sunday, 27 April 2014

DIY: make up storage

Hey,


So today’s post is a DIY on how to make your own make up storage to fit in your drawer. I looked and looked for cheap and simple make up storage but I didn't find anything to my taste, so I decided to make my own! My DIY is so simple and basically separates your drawer to organise your makeup in a way that will be unique to your make up collection.

All you will need is:


1.      First put in your drawer inserts to how you would like them.
2.      Take one compartment, to start with. Measure the width and length of the box and cut lengths of card- these will become very handy! These can be any height that you want them to be.
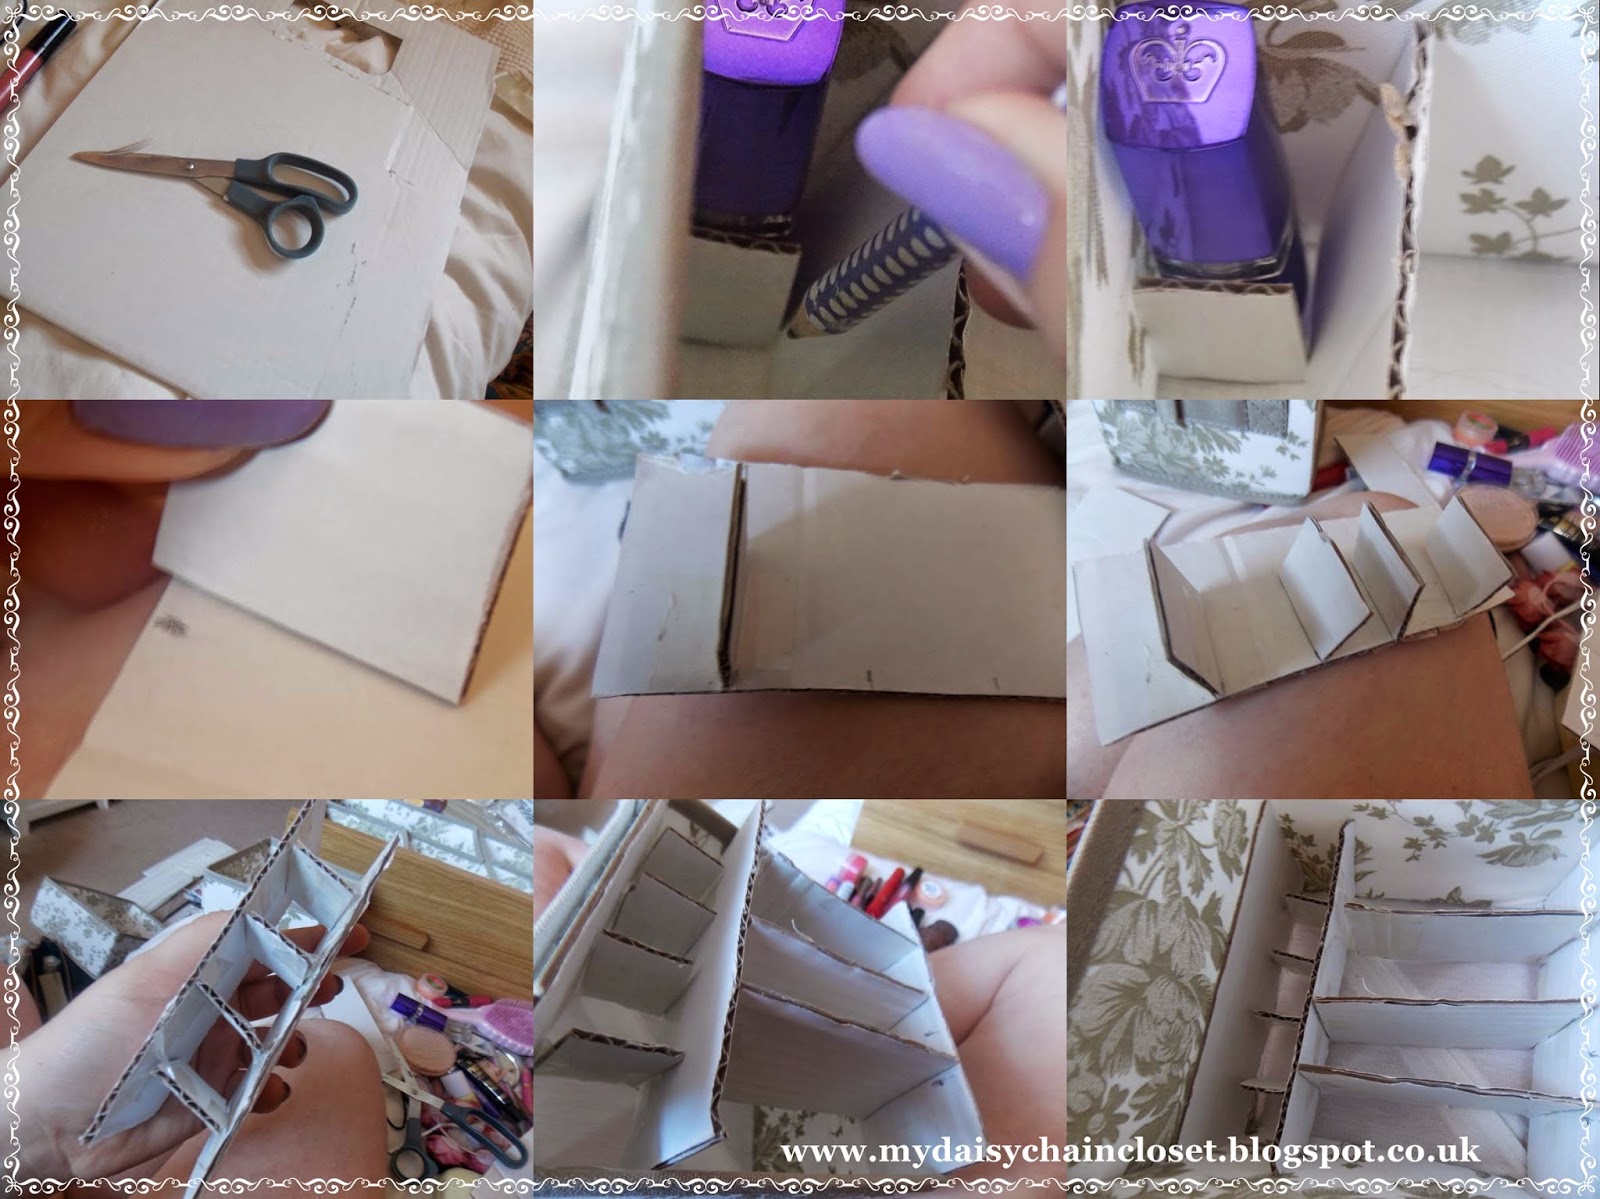
3.      With one of your lengths/ widths, take the first product you want to store. In the image, I choose a lipstick to begin with. I marked onto the card where I needed the other piece to be. Then I cut a piece of card that is the width of the lipstick.

4.      To stick these pieces together, I put L shape of sellotape on either side of the card.  Then I repeat the process of adding pieces of card that are the widths of the products. In my example, I had a line of lipsticks, so the widths were the same.
5.      Now you have to keep adding pieces of card, and fixing them with the sellotape, until you have filled the space that is equivalent of the width/ length of the drawer insert.
6.      Carefully push in the card layout into the drawer insert, and then fill it with the perfectly fitting make up.


I’m sorry because I seem to have made a really easy DIY seem really complicated, but this is where I was inspired, a video on LaurDIYs channel- https://www.youtube.com/watch?v=VeXYsZDZwBY .
I hope you like my idea, please let me know if you want to try this DIY or if you have any other ideas,

Thank you, 

Sunday, 16 March 2014

Homemade- DIY lanterns

Hey,


Today’s blog post is one that I’ve been really excited about. I have been doing a lot of crafty and arty activities, and I have always loved DIYs, so this is going to be a home décor DIY.
This is a step by step to make a homemade tea-light lantern. These are so cute as a gift or as room décor, and are brilliant to accessories your room with. Also, this is based on recycling a product, which makes this such an amazing eco-friendly task.


I came up with this idea when I saw something similar in a shop. I google it and found inspiration for my final design via Pintrest and http://growcreative.blogspot.co.uk/2012/07/tin-can-lanterns-tutorial.html .

You will need:
  • A food tin, I used Heinz beans
  • Wire
  • Paint of any colour, acrylic is better
  • Paintbrush
  • A nail
  • A hammer/ a pebble
  • Paper and a pencil
  • A tealight

  1. The first step is to use whatever is on the inside of the tin. After this, just wash the tin and dry it. Make sure you remove the label. Once the product is drained you are ready to start. You will need to measure round the tin and then produce a slip of paper which fits around the tin. You will need this for the pattern.
  2. Now fill the tin with water and put it into your freezer. Now leave it overnight, or as long as it needs to freeze.
  3. Whilst you are waiting, take the paper and draw out a pattern. Putting dots on the places where you want holes. This can be any sort of design, like swirls, hearts, zigzags or flowers. Feel as free as you like, but remember that the ends of the paper will match up. Also remember to draw bigger dots for where you want the handle to be.
  4. Take your tin out of the freezer. You will need to be prepared for the next steps as you can needs to stay frozen.
  5. Now, using a towel if you want (so the table does not get wet). Take your paper and sellotape it around the tin. Now take the nail and place it over the dots on your design. Hammer the nail with your hammer/ nail, until it breaks through the top layer of the tin.
  6. When you have completed all the dots, and your frozen water will probably not very cold. Put the tin into a sink of hot water. This will melt the ice quicker.
  7. When the tin is ready, and has no ice inside, you can continue. Take the tin and begin to paint it. You can you any paint, spray is probably preferable though, and paint the tin. It will take a lot of layers to build up colour.
  8. Now measure out how much wire you want, for the handle, depending on what type of lantern you desire. Now paint this, also with many coats.
  9. When you have done these steps, and the paint is dry, you can put it together. The handle is simply threaded through the larger holes and twisted.
  10. To finish, you can add ribbon around the bottom. Now your lantern is complete. Add a tealight in the bottom.


So I hope you enjoyed this little DIY, it’s my first home decore of my new home-made series. I would love to know what you think and some of your creations. Sorry I missed my post on wednesday. Enjoy,